Thursday, February 25, 2010
Crushed Oreo Cookies
When you write a food blog, people tend to talk to you about food--a lot. And obviously, I have a passion for researching new recipes, so I don't mind. Well, a few weeks ago at a friend's birthday party (a lady Gaga/Miley Cyrus themed birthday party, I should add), I was talking with my friend, Hannah (obligatory shout-out), about the one cookie recipe I was DYING to find--the Crushed Oreo Cookies sold at Wisemiller's in Georgetown a.k.a. the reason I gained the Freshman 15. That night, she got home and went on a google-mission and found this recipe for oreo cookies. As I read the recipe, I thought, "Could this be it???"
I am going to have to do an official side-by-side comparison at some point, but this comes pretty close to the real deal!
Thank you, Hannah!
Here is what you will need:
Step 1: Preheat the oven to 350 degrees. Cream butter and sugars until well combined. Add the eggs and vanilla.
Step 2: Place flour, baking soda, and salt into a large bowl, and stir. Slowly add the dry ingredients to the wet ingredients.
Step 3: Add crushed oreos and chocolate chips. (At what point does eating spoonfulls of batter stop counting as "taste-testing"?)
Step 4: Scoop dough onto parchment-lined baking sheet (about 1 tablespoon). I sprinkled each cookie with crushed oreos (they looked like they needed a little extra oreo). Bake for 7-9 minutes or until cooked, but still soft. Let cool on baking sheet for 3 minutes before transferring to cooling rack.
The full list of ingredients:
2 sticks softened butter
12 Tablespoons sugar
12 Tablespoons brown sugar
2 eggs
1 teaspoon vanilla
2 1/2 Cups flour
1 teaspoon baking soda
1 teaspoon salt
16 broken pieces Oreo Cookies (I thought it could use a few more cookies, actually--maybe 19 or 20?)
2 Cups chocolate chips
Saturday, February 20, 2010
Meatloaf Muffins
First lesson of meatloaf muffins---they are not photogenic (I tried taking photos of them from 20 different angles, and this was the best one) nor are they guest-worthy....but they are a perfect weeknight meal at home, and this version happens to be healthy and really good.
Another lesson, double-check the pantry before heading to the grocery store. I under-estimated our recent ketchup consumption. Exhibit A:
This was barely enough. I usually love to really smother the tops with ketchup, so I had to be a little more frugal. (BBQ sauce probably would have been a good substitute, but we were fresh out of that too.)
This recipe is from Cooking Light. Rather than use bread crumbs, they use crushed fat-free saltines. As always, I was skeptical, but it works well. I highly recommend serving these meatloaf muffins with mashed potatoes. I served mine with roasted garlic mashed potatoes. Cooking them in the muffin cups creates perfect little servings and definitely reduces cooking time.
Here is what you will need:
Step 1: Preheat oven to 350°. Chop the vegetables.
Step 2: Heat the olive oil in a large nonstick skillet over medium-high heat. Add chopped onion, chopped carrot, dried oregano, and minced garlic; sauté 2 minutes. Cool.
Step 3: Crumble the saltine crackers while the vegetables cook. Since I am still living life without a food processor, I used a zip lock bag and smash the crackers until they are finely crushed.
Step 4: Combine onion mixture, 1/2 cup ketchup, and the remaining ingredients except cooking spray (lean beef, mustard, Worcestershire sauce, eggs, and freshly ground pepper) in a large bowl.
Step 5: Spoon the meat mixture into 12 muffin cups coated with cooking spray. Top each with 2 teaspoons ketchup (I don't really measure, I just smooth the ketchup on until they are each sufficiently covered). Bake at 350° for 30 minutes or until a thermometer registers 160°. Let stand for 5 minutes.
List of Ingredients:
1 teaspoon olive oil
1 cup finely chopped onion
1/2 cup finely chopped carrot
1 teaspoon dried oregano
2 garlic cloves, minced
1 cup ketchup, divided
1 1/2 pounds ground beef, extra lean (raw)
1 cup finely crushed fat-free saltine crackers (about 20)
2 tablespoons prepared mustard
1 teaspoon Worcestershire sauce
1/4 teaspoon freshly ground black pepper
2 large eggs
Cooking spray
Tuesday, February 16, 2010
Basic Jambalaya
In my house, we joke that I run the kitchen like a college cafeteria, and by that, I mean I love theme nights! I like to dye food green on St. Patrick's day, shape food into hearts on Valentine's Day, eat Mexican food on Cinco de Mayo, etc. etc. So of course, I took advantage of Mardi Gras and decided to try my hand at a classic New Orleans dish--Jambalaya. I think I have eaten jambalaya maybe once in my entire life (same goes for my husband a.k.a. my taste-tester), so we actually had no real point of comparison. So without any preconceived notions, we thought this was delicious.
I got the recipe from Martha Stewart,but I had to make a couple of adjustments. They didn't have any andouille sausage at the grocery store, but the butcher told me, "well, if you're talking jambalaya, what you really want is chorizo." So I trusted him, but since I was worried the jambalaya wouldn't be spicy enough without the andouille sausage, I threw in 1/2 a teaspoon of cayenne pepper. I think it had enough kick, but you can always taste and add more if necessary.
Here is what you will need:
Step 1: Heat oil in a Dutch oven over medium-high heat. Season chicken with salt and pepper. Cook until golden brown, about 5 minutes per side. Cut into 3/4-inch pieces; set aside.
Step 2: Cut the vegetables, and add vegetables to pot. Cook, stirring, 5 minutes.
Step 3: Add sausage; cook 3 minutes. Add garlic; cook 1 minute.
Step 4: Stir in stock, Old Bay, tomatoes, and 1/2 cup water; bring to a boil. Add rice and chicken. Reduce heat; simmer 5 minutes.
Step 5: Cover; remove from heat. Let stand until rice is tender and liquid is mostly absorbed, 30 to 35 minutes. Season with salt and pepper.
List of ingredients:
1/4 cup olive oil
1 pound boneless, skinless chicken breast halves
Coarse salt and freshly ground pepper
3 celery stalks, finely chopped
1 medium onion, finely chopped
1 green bell pepper, stemmed, seeded, and finely chopped
1 pound andouille sausage, cut into 1/2-inch pieces (I used Chorizo*)
2 garlic cloves, minced
2 cups homemade or low-sodium store-bought chicken stock
3/4 teaspoon Old Bay seasoning
1 can (14 ounces) crushed tomatoes with juice
1 cup long-grain rice
*if using chorizo, add 1/2 tsp of cayenne pepper for some additional kick.
Sunday, February 14, 2010
Lentil Soup
There is nothing better during the winter than a nice hot bowl of hearty soup. This lentil soup is one of Giada's recipes. I absolutely love her show, and my husband loves her too...for very different reasons though.
I like to let this soup simmer for a few hours before serving. That way, it gets really thick, and all of the flavors have time to come together. This also freezes well.
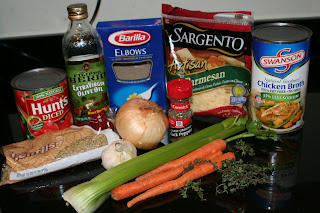
Here is what you will need:
Step 1: Heat the oil in a heavy large pot over medium heat. Add the onion, carrots, and celery.
Step 2: Add the garlic, 1 teaspoon of salt, and sprinkle generously with pepper and saute until all the vegetables are tender, about 5 to 8 minutes.
Step 3: Add the tomatoes with their juices.
Step 4: Simmer until the juices evaporate a little and the tomatoes break down, stirring occasionally, about 8 minutes.
Step 5: Add the lentils and mix to coat.
Step 6: Add the broth and stir. Add the thyme sprigs. Bring to a boil over high heat. Cover and simmer over low heat until the lentils are almost tender, about 30 minutes.
Step 7: Stir in the pasta. Simmer until the pasta is tender but still firm to the bite, about 8 minutes. Season with salt and pepper, to taste.
Step 8: Ladle the soup into bowls. Sprinkle with the Parmesan, drizzle with olive oil, and serve.
List of Ingredients:
2 tablespoons olive oil, plus extra for drizzling
1 medium onion, chopped
2 carrots, peeled and chopped
2 celery stalks, chopped
2 garlic cloves, chopped
Salt and freshly ground black pepper
1 (14 1/2-ounce) can diced tomatoes
1 pound lentils (approximately 1 1/4 cups)
11 cups low-salt chicken broth
4 to 6 fresh thyme sprigs
2/3 cup dried elbow pasta
1 cup shredded Parmesan
Tuesday, February 9, 2010
Arroz con Pollo
Today, we are making Arroz con Pollo, english translation "chicken and rice," but please please resist the temptation to call this chicken and rice. This is Spanish Arroz con Pollo. If my gringo husband can finally learn to call it arroz con pollo, you can too.
This is my mother's recipe, and it probably goes back several generations. Getting recipes from my mom is a lot like pulling teeth. She cooks from instinct, so when giving amounts, she says "oh, you know...a little bit of this..." or "as much as it looks like it needs..." After a few trials and lots of errors, I finally got the recipe just right and somehow made it my own. Please enjoy, and feel free to add your own twist too.
Here is what you will need:
Step 1: Heat the pan on medium-high heat with 3-4 tablespoons of olive oil. Chop 1 medium onion and add to the pan when the oil is hot. Sprinkle a generous amount of garlic powder all over the chopped onion (see step 6; I forgot to add the garlic powder in Step 1).
Step 2: Chop up 1 small tomato and add it the pan.
Step 3: Add 1 chicken bouillon cube and 1 packet of saffron.
Stir it around, and it will look nice and yellow like this.
Step 4: Chop up a couple of small carrots and one small red pepper, and throw them in the pan. Stir.
Step 5: Now chop up 1 pound of chicken tenderloins, and once the vegetables have softened, add the chicken to the pan. Continue to move the chicken and vegetables around, so they don't burn.
Step 6: Everyone makes mistakes...I got a little distracted with the photo taking and forgot to add the garlic powder in the first step, so I tossed it all over the chicken. Ideally, you would it add it at the same time as the onion. Whether it is in Step 1 or Step 6, sprinkle a generous amount.
Step 7: Once the chicken has browned, add 1 cup of rice, sprinkle 1 teaspoon of salt over the entire dish, and then add about 3/4ths of a small can of peas to the dish. After letting the rice soak up the flavors for a little less than a minute, I add 1 cup of water and 1 cup of white wine. The older the wine, the better. Turn the heat down to medium.
Step 8: After about 20 minutes, I needed to add another 3/4 cups of water because the water was almost soaked up, and the rice wasn't quite ready. And then, for good measure, after 10 more minutes, I tossed a 1/4 cup of wine (my mother would dissaprove,but I love the flavor of wine).
If the rice still seems a little dry, maybe add another 1/4 cup of water. It really shouldn't need more than that. I let it simmer for another ten minutes until the water was completely absorbed, and then, it was ready to serve!
List of ingredients:
1 lb of chicken tenderloins (no more than 1 lb--we've determined, that's too much)
3-4 tablespoons of olive oil
1 medium onion
1 chicken bouillon cube
2-3 carrots
1 small tomato
1 small red pepper
1 packet of saffron
1 small can of sweet peas
garlic powder
1 teaspoon of salt
1 cup of rice
1 cup of old white wine
Subscribe to:
Posts (Atom)