Thursday, April 8, 2010

Shrimp Tacos with Fruit Salsa


I have a short list of recipes from cooking light that have become standard weeknight fare in my home. Recently, I have been looking for some new healthy recipes to add to my repertoire though, and after perusing the cooking light website, this recipe for shrimp tacos with fruit salsa caught my eye. I was hoping this recipe would make enough for leftovers, but we ate every last bite. It was really good!

With just a few adjustments, this meal could easily go from a regular weeknight meal to "guest-worthy." Using fresh fruit rather than canned fruit would make it an ideal summer meal, and my husband suggested adding a touch of jalapeno to the salsa next time to add an additional kick (but that is pretty much his suggestion for every meal). I also used twice as much chili powder and cumin than the recipe called for to give the shrimp a bit more flavor. This meal would also be perfect with a side of fresh guacamole.

Overall, this was really easy to prepare. Between cleaning the shrimp and chopping the vegetables and stove-top time, it only took about 45 minutes (and that includes stopping to take pictures, of course).


Here is what you will need for the salsa:


Step 1: To prepare the salsa, combine the green onions, cilantro, green chiles, lemon juice, mandarin oranges, and pineapple bits in a bowl. Cover and chill. ****This salsa would definitely improve in taste with some fresh fruit vs. canned and for a bit of a kick, a 1/2 teaspoon of a jalapeno pepper.


Here is what you will need for the shrimp tacos:


Step 1: Chop the veggies.


Step 2: Place a large nonstick skillet coated with cooking spray over medium-high heat until hot. Add bell pepper, onion, and garlic; sauté 2-5 minutes.


Step 3: Add shrimp, tomato, cumin, and chili powder; sauté 3 minutes or until shrimp are done.


Step 4: Stir in cilantro. ***At this point, I tasted the shrimp and added an additional 1/2 teaspoon of cumin and 1/2 teaspoon of chili powder because it need a little more flavor. I would advise testing it as well and adjusting the seasoning.


Step 5: Spoon 1/2 cup shrimp mixture over one half of each tortilla, and top with about 3 tablespoons cheese and 2 tablespoons salsa; fold tortillas in half.


Full List of Ingredients for the Salsa:
1/4 cup chopped green onions
1 tablespoon chopped fresh cilantro
1 tablespoon canned chopped green chiles
1 tablespoon lemon juice
1 (11-ounce) can mandarin oranges in light syrup, drained
1 (8-ounce) can pineapple tidbits in juice, drained

Full List of Ingredients for the Shrimp Taco Filling:
Cooking spray
1 cup yellow bell pepper strips
1 cup vertically sliced red onion
1 garlic clove, minced
1 1/2 pounds medium shrimp, peeled and deveined
1 cup chopped tomato
1/2 teaspoon ground cumin (I used 1 teaspoon)
1/2 teaspoon chili powder (I used 1 teaspoon)
2 tablespoons chopped fresh cilantro
8 (6-inch) flour tortillas
1 1/4 cups (5 ounces) shredded reduced-fat Monterey Jack cheese

Monday, April 5, 2010

Cheesecake with Blueberry Topping


Warm weather is officially here!! This past weekend, I enjoyed almost every meal outdoors--from a backyard in Capitol Hill to the tidal basin surrounded by cherry blossoms to a rooftop downtown. It was fantastic. On Friday night, my friend hosted a dinner party, and I jumped at the opportunity to bring dessert (I can never quite justify baking an entire cake for just two). I decided to bring blueberry cheesecake because it is such a light cool dessert, perfect for a warm spring evening.

This dessert comes from none other than Martha Stewart. I first made it a couple of years ago, and it has been a household favorite ever since. This is a great cheesecake for "first timers" because even if it begins to crack, which the water bath should hopefully prevent, the fruit topping will hide any imperfections.

Here is what you will need for the crust:


Step 1: Make the crust: Preheat oven to 325 degrees and put a large pot of water to boil. Coat a 9-inch springform pan with cooking spray. Wrap exterior of pan (including base) with foil.


Step 2: Stir together graham cracker crumbs, sugar, cinnamon, and salt.


Step 3: Pour in melted butter.


Step 4: Press mixture firmly into bottom and 3 inches up sides of pan. Refrigerate 15 minutes.


While the crust chills in the refrigerator, make the filling..

Here is what you will need for the filling:


Step 1: Beat cream cheese with a mixer on medium speed until fluffy.


Step 2:Reduce speed to low, and add sour cream, sugar, eggs, lemon zest, and vanilla. Beat until well combined (do not overmix).


Step 3: Pour filling into chilled crust. Set springform pan in a large, shallow roasting pan.


Step 4: Carefully ladle enough boiling water into roasting pan to come halfway up sides of springform pan. Bake until cheesecake is set but still slightly wobbly in center, about 1 hour, 15 minutes. Transfer roasting pan to a wire rack. Let cake cool in roasting pan 30 minutes. Remove cheesecake from roasting pan, and refrigerate, uncovered, at least 8 hours (or overnight).


While the cheesecake cooks in the oven, make the topping.

Here is what you will need for the blueberry topping:


Step 1: Combine all ingredients in a saucepan over medium-high heat.


Step 2: Bring to a simmer, and cook until berries break down, about 4 minutes.


Step 4: Let cool, then refrigerate, covered, until cold (or up to 3 days).


FINAL STEP: Run a knife around edge of cake, and unmold. Spoon topping over cake. ENJOY!


List of Ingredients for Cheesecake:

Vegetable-oil cooking spray
6 tablespoons unsalted butter, melted
2 cups graham cracker crumbs
3 tablespoons sugar
1/4 teaspoon ground cinnamon
Pinch of salt
16 ounces cream cheese, room temperature
16 ounces sour cream
1 cup sugar
3 large eggs
1 1/2 teaspoons finely grated lemon zest
1 teaspoon pure vanilla extract
Boiling water, for roasting pan

List of Ingredients for Blueberry Topping:

1 1/2 pints (3 cups) blueberries
3/4 cup sugar
2 tablespoons unsalted butter
2 tablespoons fresh lemon juice
1 tablespoon cornstarch

Thursday, April 1, 2010

Malaysian Chicken Pizza


Malaysian Chicken Pizza is a weekday favorite in my house. When I make it,I feel like we are eating at California Pizza Kitchen. This recipe originally came from cooking light, but like all recipes I take from cooking light, I tweaked it a little bit. This probably makes it a little less "light" but ultimately, it became a dish my husband requests all the time--so I think the changes were worth it.

The first few times I made this pizza, I had the issue that the sauce never became very thick and would drip over the edges and burn. I realized the sauce needed to simmer for at least 10-12 minutes (the directions said 6 minutes), and extra peanut butter really helped too (3 heaping tablespoons versus 2) as well as firmly packing the brown sugar. I also started adding extra mozzarella in order to keep the sauce from running over the edges. Again, this probably makes the pizza a little less "light" but much more successful.

Here is what you will need:


Step 1: Preheat oven to 500°. Chop the chicken into bite-sized pieces.


Step 2: Heat a nonstick skillet coated with cooking spray over medium heat. Add chicken, and sauté 2 minutes.


Step 3: While the chicken is cooking, combine the first 8 ingredients in a bowl--peanut butter, rice vinegar, crushed red pepper, water, minced ginger, brown sugar, low-sodium soy sauce, and garlic; stir well with a whisk.


Step 4: Remove chicken from pan. Pour the rice vinegar mixture into the pan, and bring it to a boil over medium-high heat. Cook mixture until slightly thickened. This always takes me at least 10-12 minutes.


Step 5: Return the chicken to the pan; cook for 1 minute or until the chicken is done. (Mixture will be the consistency of thick syrup.)


Step 6: Sprinkle cheese over prepared crust, leaving a 1/2-inch border (I don't measure this, I just sprinkle it all over the pizza---if you really want to keep this light, use the measurements from the original ingredients listed below), and top with the chicken mixture. I cannot emphasize enough, just spoon the chicken onto the pizza with a little bit of sauce, and leave a decent border. If the pizza looks sufficiently covered, do not pour the remaining sauce over the pizza because it will drip over the crust and burn.


Step 7: Bake at 500° for 12 minutes on the bottom rack in oven. Sprinkle with green onions. Place pizza on a cutting board; let stand 5 minutes.


The list of ingredients:
3/4 cup rice vinegar
1/4 cup firmly packed brown sugar
1/4 cup low-sodium soy sauce
3 tablespoons water
1 tablespoon minced peeled fresh ginger
2 tablespoons chunky peanut butter (I find 3 heaping tablespoons makes for a much better pizza)
1/2 to 3/4 teaspoon crushed red pepper
4 garlic cloves, minced
Cooking spray
1/2 pound skinless, boneless chicken breasts, cut into bite-sized pieces
1/2 cup (2 ounces) shredded reduced-fat, reduced-sodium Swiss cheese (I only use mozzarella because that is what I usually have on hand)
1/4 cup (1 ounce) shredded part-skim mozzarella cheese
1 (12-inch) Basic Pizza Crust
1/4 cup chopped green onions

Sunday, March 28, 2010

Chocolate Peanut Butter Cake


Last Monday I received an email that started off with the line "You MUST make this cake!!," and she went on to tell me about the most delicious peanut butter chocolate cake she made for her husband's birthday. She got the recipe off of Smitten Kitchen, and they got the cake recipe from the book Sky High: Irresistible Triple-Layer Cakes which is now officially on my birthday present wish list. The cake on the Smitten Kitchen Blog looks semi-professional, so try not to judge mine too harshly.

She was not lying about this cake. It is UNBELIEVABLE!! Next to Mr. Darcy and Elizabeth, I believe peanut butter and chocolate might be the greatest pairing of all time (apologies for the nerdy literary reference).

I liked this recipe because the steps were easy to divide up, and ultimately, it only required 3 bowls to make. I'm not particularly good at icing cakes, so the chocolate ganache did a nice job of covering up my cake's imperfections and creating an overall "rustic" look. The recipe is meant for 3 8-inch pans, but I used 3 9-inch pans. The cake probably wasn't as tall as the original, but that's all.

Both my friend and the blogger at smitten kitchen complained about the cake being difficult to ice because it was so moist and crumbly. My cakes cooled in the fridge all day, so I didn't have that problem. They both suggested creating a crumb layer. I've never actually done that, so here is a how-to link about icing cakes http://www.chow.com/stories/10046 that I found helpful.


Here is what you will need:


Step 1: Preheat the oven to 350 degrees F. Butter the bottoms and sides of three 8-inch round cake pans. Line the bottom of each pan with a round of parchment or waxed paper and butter the paper.Sift the flour, sugar, cocoa powder, baking soda, and salt into a large bowl. Whisk to combine them well.


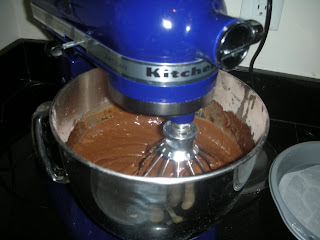
Step 2: Add the oil and sour cream and whisk to blend. Gradually beat in the water. Blend in the vinegar and vanilla. Whisk in the eggs and beat until well blended.


Step 3: Scrape down the sides of the bowl and be sure the batter is well mixed.


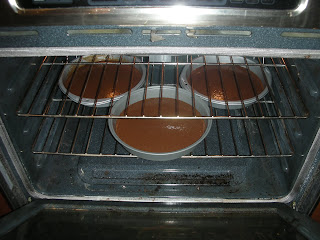
Step 4: Divide among the 3 prepared cake pans.Bake for 30 to 35 minutes, or until a cake tester or wooden toothpick inserted in the center comes out almost clean. Let cool in the pans for about 20 minutes. Invert onto wire racks, carefully peel off the paper liners, and let cool completely. ( Note: I made these in the morning and kept them in the refrigerator all day, so they would be firm by the time I wanted to ice them. I had been warned that they would be very "crumbly" otherwise. The blog I took this from suggested putting them in the freezer for 30 minutes before icing them.)


Full List of Ingredients for the Cake Layers:
2 cups all-purpose flour
2 1/2 cups sugar
3/4 cup unsweetened cocoa powder, preferably Dutch process
2 teaspoons baking soda
1 teaspoon salt
1 cup neutral vegetable oil, such as canola, soybean or vegetable blend
1 cup sour cream
1 1/2 cups water
2 tablespoons distilled white vinegar
1 teaspoon vanilla extract
2 eggs

When the cakes are cool, make the peanut butter frosting.

Here is what you will need:


Step 1: Be sure to sift the sugar--it makes a difference.


Step 2: In a large bowl with an electric mixer, beat the cream cheese and butter until light and fluffy. Gradually add the confectioners’ sugar 1 cup at a time, mixing thoroughly after each addition and scraping down the sides of the bowl often. Continue to beat on medium speed until light and fluffy, 3 to 4 minutes


Step 3: Add the peanut butter and beat until thoroughly blended.


Step 4: Frost the cake with the icing. Place one layer, flat side up, on a cake stand or large serving plate. Spread 2/3 cup cup of the Peanut Butter Frosting evenly over the top. Repeat with the next layer. Place the last layer on top and frost the top and sides of the cake with the remaining frosting. Place the iced cake in the fridge uncovered, so it will be nice and firm before you spread the chocolate ganache over it.


Full List of Ingredients for the Peanut Butter Icing:
10 ounces cream cheese, at room temperature
1 stick (4 ounces) unsalted butter, at room temperature
5 cups confectioners’ sugar, sifted
2/3 cup smooth peanut butter (the real thing--none of this organic/low-sugar stuff)


While the iced cake is cooling, make the chocolate-peanut butter ganache.


Here is what you will need:


Step 1: In the top of d double boiler or in a bowl set over simmering water, combine the chocolate, peanut butter, and corn syrup. Cook, whisking often, until the chocolate is melted and the mixture is smooth.


Step 2: Remove from the heat and whisk in the half-and-half, beating until smooth. Use while still warm.


FINAL STEP!! To decorate with the Chocolate–Peanut Butter Glaze, put the cake plate on a large baking sheet to catch any drips. Simply pour the glaze over the top of the cake, and using an offset spatula, spread it evenly over the top just to the edges so that it runs down the sides of the cake in long drips. Refrigerate, uncovered, for at least 30 minutes to allow the glaze and frosting to set completely. Remove about 1 hour before serving.


Full List of Ingredients for the Chocolate-Peanut Butter Ganache:
8 ounces seimsweet chocolate, coarsely chopped
3 tablespoons smooth peanut butter
2 tablespoons light corn syrup
1/2 cup half-and-half

So the reason this cake is displayed on a random cake plate is because I needed to transport it to my husband's office for his going away party, so I didn't have a chance to cut into it at home and take photos from 20 different angles (I'm lucky my food doesn't seem to be too camera shy). I wanted a picture of the "inside" though, so I snuck off with my camera during the party and took a quick picture of the last man standing. Apologies it is not very artistic, but I didn't want to come off as the crazy wife who takes pictures of her food, so I had to act fast.

Despite the horrible lighting and bad cutting job--you get the idea--3 amazing layers of deliciousness.